Archive for the ‘OpenGL minimalism’ tag
Antialiased Cel Shading

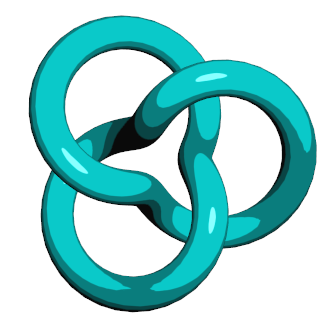
Cel shading (also known as toon shading) is nothing new, but it’s a fun and simple way to learn about shaders. This post walks through the development of a simple OpenGL 3.0+ demo for cel shading that antialiases the boundaries between color bands — without using multisampling! The antialiasing is achieved using shader derivatives (the fwidth function in GLSL).
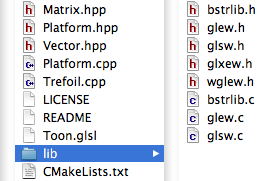
I posted some sample code at the end of this article that’s tested on Ubuntu, Snow Leopard, and Windows. On Snow Leopard, the demo falls back to using an older version of GLSL. I kept the code short and sweet; it doesn’t have any dependencies on libraries like SDL or GLUT. It’s harder and harder to write minimalist OpenGL demos nowadays, especially if you write forward-compatible OpenGL code like I do. The only libraries that this demo uses (other than OpenGL itself) are GLEW and GLSW, both of which consist of just a few small C files that are built within the project itself.
I settled on CMake for my build tool, which I’m starting to love. Don’t scream “No, not another build tool!!” In the words of Alan Kay, Simple things should be simple, complex things should be possible. CMake takes this to heart. It’s lightweight, cross-platform, and well-worn; it’s used in popular packages like Blender, KDE, and Boost. Best of all, it doesn’t just generate makefiles, it can generate actual IDE projects that you can open with Visual Studio, Xcode, etc.
Per-Pixel Lighting
Before writing a cel shader, let’s come up with a standard per-pixel lighting effect, then modify it to produce a cartoony result. With standard diffuse+specular lighting, we should see something like this:
![]()
Now here’s the GLSL effect:
-- Vertex

in vec4 Position;
in vec3 Normal;

uniform mat4 Projection;
uniform mat4 Modelview;
uniform mat3 NormalMatrix;
uniform vec3 DiffuseMaterial;

out vec3 EyespaceNormal;
out vec3 Diffuse;

void main()
{
    EyespaceNormal = NormalMatrix * Normal;
    gl_Position = Projection * Modelview * Position;
    Diffuse = DiffuseMaterial;
}

-- Fragment

in vec3 EyespaceNormal;
in vec3 Diffuse;
out vec4 FragColor;

uniform vec3 LightPosition;
uniform vec3 AmbientMaterial;
uniform vec3 SpecularMaterial;
uniform float Shininess;

void main()
{
    vec3 N = normalize(EyespaceNormal);
    vec3 L = normalize(LightPosition);
    vec3 E = vec3(0, 0, 1);
    vec3 H = normalize(L + E);

    float df = max(0.0, dot(N, L));
    float sf = max(0.0, dot(N, H));
    sf = pow(sf, Shininess);

    vec3 color = AmbientMaterial + df * Diffuse + sf * SpecularMaterial;
    FragColor = vec4(color, 1.0);
}
I won’t go into a detailed explanation since you can pick up any graphics book (including mine) and find an explanation of the math behind real-time lighting. However, it’s important to notice the diffuse factor (df) and specular factor (sf) variables, since we’ll be manipulating them later in the post. They each represent a level of intensity from 0 to 1.
By the way, the gray ‘--’ section dividers are not legal in the shading language, but they get parsed out when using The OpenGL Shader Wrangler for managing shader strings.
Tessellating the Trefoil Knot
The Trefoil shape is just a parametric surface. I’ll list a few key functions here that build out the indexed triangle list. First, let’s define some constants:
static const int Slices = 128;
static const int Stacks = 32;
static const int VertexCount = Slices * Stacks;
static const int IndexCount = VertexCount * 6;
Slices and Stacks control how the domain gets sampled. For coarse tessellation, use small numbers; for tiny triangles, use large numbers.
Next let’s write the evaluation function for the knot shape. The coordinates in the domain are in [0, 1]. Despite appearances, the following code snippet is C++, not GLSL! The custom vec3 type is designed to mimic GLSL’s built-in vec3 type. (See Vector.hpp in the sample code.)
vec3 EvaluateTrefoil(float s, float t)
{
    const float a = 0.5f;
    const float b = 0.3f;
    const float c = 0.5f;
    const float d = 0.1f;
    const float u = (1 - s) * 2 * TwoPi;
    const float v = t * TwoPi;
    const float r = a + b * cos(1.5f * u);
    const float x = r * cos(u);
    const float y = r * sin(u);
    const float z = c * sin(1.5f * u);

    vec3 dv;
    dv.x = -1.5f * b * sin(1.5f * u) * cos(u) -
            (a + b * cos(1.5f * u)) * sin(u);
    dv.y = -1.5f * b * sin(1.5f * u) * sin(u) +
            (a + b * cos(1.5f * u)) * cos(u);
    dv.z = 1.5f * c * cos(1.5f * u);

    vec3 q = dv.Normalized();
    vec3 qvn = vec3(q.y, -q.x, 0).Normalized();
    vec3 ww = q.Cross(qvn);

    vec3 range;
    range.x = x + d * (qvn.x * cos(v) + ww.x * sin(v));
    range.y = y + d * (qvn.y * cos(v) + ww.y * sin(v));
    range.z = z + d * ww.z * sin(v);
    return range;
}
Next up is the code that calls the preceding function many times, building up a list of positions and normals along the way. It also creates the VBO and returns its handle:
GLuint CreateVertexBuffer()
{
    Vertex verts[VertexCount];
    Vertex* pVert = &verts[0];

    float ds = 1.0f / Slices;
    float dt = 1.0f / Stacks;

    // The upper bounds in these loops are tweaked to reduce the
    // chance of precision error causing an incorrect # of iterations.

    for (float s = 0; s < 1 - ds / 2; s += ds)
    {
        for (float t = 0; t < 1 - dt / 2; t += dt)
        {
            const float E = 0.01f;
            vec3 p = EvaluateTrefoil(s, t);
            vec3 u = EvaluateTrefoil(s + E, t) - p;
            vec3 v = EvaluateTrefoil(s, t + E) - p;
            vec3 n = u.Cross(v).Normalized();

            pVert->Position = p;
            pVert->Normal = n;
            ++pVert;
        }
    }

    assert(pVert - &verts[0] == VertexCount);

    GLuint handle;
    GLsizeiptr size = sizeof(verts);
    const GLvoid* data = verts[0].Position.Pointer();
    GLenum usage = GL_STATIC_DRAW;

    glGenBuffers(1, &handle);
    glBindBuffer(GL_ARRAY_BUFFER, handle);
    glBufferData(GL_ARRAY_BUFFER, size, data, usage);

    return handle;
}
So far all we’ve done is create a cloud of points without trying to connect them up into triangles. That brings us to the next task, building the VBO of triangle indices:
GLuint CreateIndexBuffer()
{
    GLushort inds[IndexCount];
    GLushort* pIndex = &inds[0];

    GLushort n = 0;
    for (GLushort i = 0; i < Slices; i++)
    {
        for (GLushort j = 0; j < Stacks; j++)
        {
            *pIndex++ = n + j;
            *pIndex++ = n + (j + 1) % Stacks;
            *pIndex++ = (n + j + Stacks) % VertexCount;

            *pIndex++ = (n + j + Stacks) % VertexCount;
            *pIndex++ = (n + (j + 1) % Stacks) % VertexCount;
            *pIndex++ = (n + (j + 1) % Stacks + Stacks) % VertexCount;
        }
        n += Stacks;
    }

    assert(n == VertexCount);
    assert(pIndex - &inds[0] == IndexCount);

    GLuint handle;
    GLsizeiptr size = sizeof(inds);
    const GLvoid* data = &inds[0];
    GLenum usage = GL_STATIC_DRAW;

    glGenBuffers(1, &handle);
    glBindBuffer(GL_ELEMENT_ARRAY_BUFFER, handle);
    glBufferData(GL_ELEMENT_ARRAY_BUFFER, size, data, usage);

    return handle;
}
That’s it for the geometry portion of the demo!
Toon Shading
Finally, we get to the meat of the article. Here’s the effect we’re after:

Recall that the fragment shader for per-pixel lighting computed a diffuse factor and a specular factor, both of which represent intensity on a zero-to-one scale:
void main()
{
    // .. snip

    float df = max(0.0, dot(N, L));
    float sf = max(0.0, dot(N, H));
    sf = pow(sf, Shininess);

    vec3 color = AmbientMaterial + df * Diffuse + sf * SpecularMaterial;
    FragColor = vec4(color, 1.0);
}
You can think of the diffuse and specular factors as separate non-linear color gradients that get added together.
We need to chop up those color gradients into a small number of regions, then flood those areas with a solid color. Let’s chop up the diffuse gradient into 4 intervals, and chop specular into 2 intervals. Insert the gray lines into your fragment shader:
void main()
{
    // .. snip

    const float A = 0.1;
    const float B = 0.3;
    const float C = 0.6;
    const float D = 1.0;

    float df = max(0.0, dot(N, L));
    if (df < A) df = 0.0;
    else if (df < B) df = B;
    else if (df < C) df = C;
    else df = D;
    float sf = max(0.0, dot(N, H));
    sf = pow(sf, Shininess);
    sf = step(0.5, sf);

    vec3 color = AmbientMaterial + df * Diffuse + sf * SpecularMaterial;
    FragColor = vec4(color, 1.0);
}
That’s all there is to it! Note the sneaky usage of the GLSL step function for specular. It’s defined like this:
float step(float edge, float x)
{
    return x < edge ? 0.0 : 1.0;
}
Makes sense eh?
Antialiasing
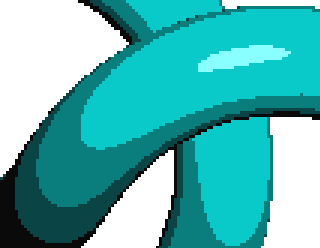
Let’s zoom in on the color bands:

Ewww!! Gotta do something about that aliasing.
Let’s start with the specular highlight since it has only two regions. One way of achieving antialiasing is creating a smooth gradient that’s only a few pixels wide, right where the hard edge occurs. Let’s add an if that checks if the current pixel is within an epsilon (E in the code) of the hard edge. If so, it manipulates the specular factor to smoothly transition between the two colors:
void main()
{
    // snip...

    float E = ?;
    if (sf > 0.5 - E && sf < 0.5 + E)
    {
        sf = smoothstep(0.5 - E, 0.5 + E, sf);
    }
    else
    {
        sf = step(0.5, sf);
    }

    vec3 color = AmbientMaterial + df * Diffuse + sf * SpecularMaterial;
    FragColor = vec4(color, 1.0);
}
I put a ? placeholder for the epsilon value; we’ll deal with it later. The smoothstep function might be new to you. It returns a value in the [0, 1] range based on its three inputs. GLSL defines it like this:
float smoothstep(float edge0, float edge1, float x)
{
    if (x <= edge0)
        return 0.0;

    if (x >= edge1)
        return 1.0;

    float t = clamp((x – edge0) / (edge1 – edge0), 0, 1);
    return t * t * (3 – 2 * t);
}
To summarize smoothstep, it returns 0 or 1 if x falls outside the given range; if x falls within the given range, it returns an interpolated value between 0 and 1. The fancy t*t*(3-2*t) transformation that you see on the last line is Hermite interpolation. Hermite interpolation helps with drawing curves, but it’s a bit overkill in our case. Linear interpolation is probably good enough; for potentially better performance, you can replace the call to smoothstep with this:
sf = clamp(0.5 * (sf - 0.5 + E) / E, 0.0, 1.0);
Next, let’s figure out how come up with a good epsilon value (E). Your first instinct might be to choose a small value out of the sky, say 0.01. The problem with picking a constant value is that it’s good only for a given distance from the camera. If you zoom in, it’ll look blurry; if you zoom out, it’ll look aliased. This is where derivatives come to the rescue. They tell you how quickly a given value is changing from one pixel to the next. GLSL provides three functions for derivatives: dFdx, dFdy, and fwidth. For our purposes, fwidth suffices. Our fragment shader now looks like this:
void main()
{
    // snip...

    const float A = 0.1;
    const float B = 0.3;
    const float C = 0.6;
    const float D = 1.0;

    float df = max(0.0, dot(N, L));
    if (df < A) df = 0.0;
    else if (df < B) df = B;
    else if (df < C) df = C;
    else df = D;

    float E = fwidth(sf);
    if (sf > 0.5 - E && sf < 0.5 + E)
    {
        sf = clamp(0.5 * (sf - 0.5 + E) / E, 0.0, 1.0);
    }
    else
    {
        sf = step(0.5, sf);
    }

    vec3 color = AmbientMaterial + df * Diffuse + sf * SpecularMaterial;
    FragColor = vec4(color, 1.0);
}
Next we need to tackle the transitions between the four bands of diffuse intensity. For specular antialiasing, we computed a value between 0 and 1, but this time we’ll need to generate values within various sub-intervals. The four bands of diffuse color are:
- 0 to A
- A to B
- B to C
- C to D
Since there are four bands of color, there are three transitions that we need to antialias. The built-in mix function could be useful for this; it performs simple linear interpolation:
float mix(float a, float b, float t)
{
    return a * (1.0 - t) + b * t;
}
We can combine mix and smoothstep to achieve the effect we’re after, like so:
void main()
{
    // snip...

    const float A = 0.1;
    const float B = 0.3;
    const float C = 0.6;
    const float D = 1.0;

    float E = fwidth(df);
    if (df > A - E && df < A + E)
        df = mix(A, B, smoothstep(A - E, A + E, df));
    else if (df > B - E && df < B + E)
        df = mix(B, C, smoothstep(B - E, B + E, df));
    else if (df > C - E && df < C + E)
        df = mix(C, D, smoothstep(C - E, C + E, df));
    else if (df < A) df = 0.0;
    else if (df < B) df = B;
    else if (df < C) df = C;
    else df = D;

    // snip...
}
Again, smoothstep is a bit overkill, so we can optimize it a bit. Let’s define our own function called stepmix. The final fragment shader is:
in vec3 EyespaceNormal;
in vec3 Diffuse;
out vec4 FragColor;

uniform vec3 LightPosition;
uniform vec3 AmbientMaterial;
uniform vec3 SpecularMaterial;
uniform float Shininess;

float stepmix(float edge0, float edge1, float E, float x)
{
    float T = clamp(0.5 * (x - edge0 + E) / E, 0.0, 1.0);
    return mix(edge0, edge1, T);
}

void main()
{
    vec3 N = normalize(EyespaceNormal);
    vec3 L = normalize(LightPosition);
    vec3 Eye = vec3(0, 0, 1);
    vec3 H = normalize(L + Eye);

    float df = max(0.0, dot(N, L));
    float sf = max(0.0, dot(N, H));
    sf = pow(sf, Shininess);

    const float A = 0.1;
    const float B = 0.3;
    const float C = 0.6;
    const float D = 1.0;
    float E = fwidth(df);

    if      (df > A - E && df < A + E) df = stepmix(A, B, E, df);
    else if (df > B - E && df < B + E) df = stepmix(B, C, E, df);
    else if (df > C - E && df < C + E) df = stepmix(C, D, E, df);
    else if (df < A) df = 0.0;
    else if (df < B) df = B;
    else if (df < C) df = C;
    else df = D;

    E = fwidth(sf);
    if (sf > 0.5 - E && sf < 0.5 + E)
    {
        sf = smoothstep(0.5 - E, 0.5 + E, sf);
    }
    else
    {
        sf = step(0.5, sf);
    }

    vec3 color = AmbientMaterial + df * Diffuse + sf * SpecularMaterial;
    FragColor = vec4(color, 1.0);
}
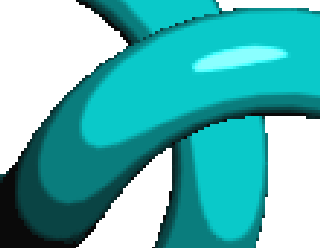
Et voila! Here’s the result:

Granted, the silhouette of the object is still aliased, but at least those color bands are nice and smooth. To fix the silhouette, you’d need to turn on multisampling or apply some fancy post-processing. (Check out a really cool paper called Morphological Antialiasing for more on that subject.)
Another thing you could do is draw some smooth lines along the silhouette, which I’ll discuss in another post.
OpenGL Minimalism

At the beginning of this article, I claimed I’d take a minimalist approach with the code. I ended up using “classless C++” for the demo. As soon as I design a class, I want to design an interface, then I start sliding down the slippery slope of complexity; I furiously write more and more infrastructure. That might be fine for scalable software, but it gets in the way when you’re writing little demos for teaching purposes. So I told myself that I’m just like Fat Albert — no class.
You might wonder why I didn’t use ANSI C or C99. With modern OpenGL you need your own vector math routines (See Matrix.hpp and Vector.hpp in the sample code), and the expressiveness of C++ is irresistible for this. Operator overloading allows you to create your own vec3 type that looks and feels a lot like the vec3 type in GLSL (which is exactly what I’ve done).
I tested this code on Mac OS X, Ubuntu, and Windows. All OpenGL calls are restricted to a single file (Trefoil.cpp). Enjoy!