Archive for the ‘opengl glass’ tag
Thick Glass with Floating-Point Textures
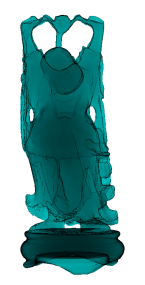
This post covers a simple way to measure thickness and apply a Fresnel term using a floating-point render target. Sample OpenGL code is provided that runs on Snow Leopard and Windows.
There’s an excellent article in GPU Pro entitled Multi-Fragment Effects on the GPU Using Bucket Sort. This technique for order-independent transparency is useful for a variety of reasons, but I noticed that one of the applications they show off can be achieved in an easier way. You can measure thickness by simply making two depth-only passes into a floating-point texture; this is a technique that NVIDIA leveraged for some of their demos back in 2005. Here’s a nice presentation that shows how:
GPU Programming Exposed: The Naked Truth Behind NVIDIA’s Demos
In olden times, you would’ve used the ARB_depth_texture extension for making depth-only passes like this, but nowadays I don’t see any reason for using a special extension. Simply bind a floating-point (or half-float) FBO and use a fragment shader that outputs gl_FragCoord.z.
You might be wondering why we need a floating-point texture for this, rather than a plain ol’ 8888 texture. Non-float textures can only represent intensities in the range [0, 1]. We need unclamped colors. Sure, we could normalize depth in the fragment shader, but that wouldn’t be enough for scenes with multiple layers of depth complexity. Consider viewing a donut edge-on; the backface pass would be accumulating twice. If we normalize to [0,1], the total accumulated depth could still be as high as 2.0.
So why not use 8888 and simply normalize depth to some small number, say 0.1? That would allow for 10 layers of depth complexity, no? Sure, but you’d run into precision artifacts real fast. (Trust me, I’ve tried it.) For a high-quality effect, it’s imperative to use a floating-point render target.
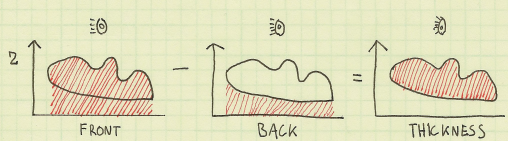
Thickness
Update: Andreas Vasilakis astutely pointed out that this can be done in only one pass if you simply leverage the gl_FrontFacing built-in varying in your fragment shader and negate depth if you’re on a backface. Sweet! I’ve implemented this idea in WebGL here.
The principle is simple: turn on additive blending, then render front faces. Next, negate Z and render back faces. The resulting image represents thickness:
Here’s the C side code for how you can do this with OpenGL:
glEnable(GL_CULL_FACE);
glEnable(GL_BLEND);
glBlendFunc(GL_ONE, GL_ONE);
GLint depthScale = glGetUniformLocation(DepthProgram, "DepthScale");

// Draw front faces in the first pass:
glUniform1f(depthScale, 1.0f);
glCullFace(GL_BACK);
glDrawElements(GL_TRIANGLES, Buddha.FaceCount * 3, GL_UNSIGNED_SHORT, 0);

// Draw back faces in the first pass:
glUniform1f(depthScale, -1.0f);
glCullFace(GL_FRONT);
glDrawElements(GL_TRIANGLES, Buddha.FaceCount * 3, GL_UNSIGNED_SHORT, 0);
And here are the shaders. I’m using old-school GLSL syntax to be compatible with Mac OS X.
-- Vertex

attribute vec4 Position;
uniform mat4 Projection;
uniform mat4 Modelview;

void main()
{
    gl_Position = Projection * Modelview * Position;
}

-- Fragment

uniform float DepthScale;

void main()
{
    float depth = DepthScale * gl_FragCoord.z;
    gl_FragColor = vec4(depth, 0, 0, 0);
}
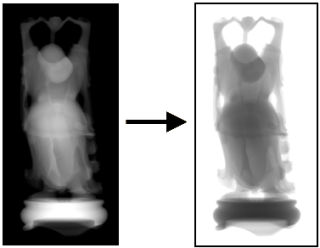
Simulating Light Absorption
Thickness alone isn’t enough for a nice glass effect though. It helps to apply Beer’s law in a final image processing pass:
I = exp(-sigma * thickness)
Sigma is the “absorption coefficient”. You’ll need to play around to find a nice value for your situation.
The following snippet shows off the image-processing shader. Note the sneaky usage of gl_FragCoord for obtaining texture coordinates; this lets us avoid the work of sending down texture coordinates just for a full-screen quad.
-- Vertex.Quad

attribute vec4 Position;

void main()
{
    gl_Position = Position;
}

-- Fragment.Absorption

uniform sampler2D Sampler;
uniform vec2 Size;
uniform vec3 Color;

void main()
{
    vec2 texCoord = gl_FragCoord.xy / Size;
    float thickness = abs(texture2D(Sampler, texCoord).r);
    if (thickness <= 0.0)
    {
        discard;
    }
    float sigma = 30.0;
    float intensity = exp(-sigma * thickness);
    gl_FragColor = vec4(intensity * Color, 1);
}
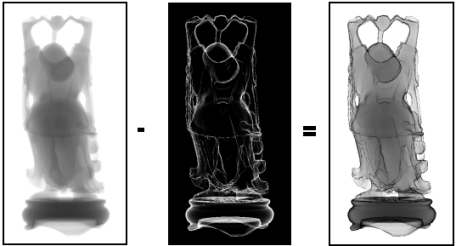
Fresnel
The Fresnel effect is a classic shader computation for making your glass even more realistic. We store thickness in the red channel and the Fresnel term in the green channel. We then subtract the Fresnel term during the image processing pass. You can visualize the subtraction like this:
The vertex shader for drawing Buddha now sends out normals and eye-space positions:
-- Vertex

attribute vec4 Position;
attribute vec3 Normal;

varying vec3 vNormal;
varying vec3 vPosition;

uniform mat4 Projection;
uniform mat4 Modelview;
uniform mat3 NormalMatrix;

void main()
{
    vPosition = (Modelview * Position).xyz;
    vNormal = NormalMatrix * Normal;
    gl_Position = Projection * Modelview * Position;
}
We can apply the Fresnel calculation in the fragment shader and write it out to the green channel like so:
-- Fragment.Depth

uniform float DepthScale;
varying vec3 vNormal;
varying vec3 vPosition;

void main()
{
    vec3 N = normalize(vNormal);
    vec3 P = vPosition;
    vec3 I = normalize(P);
    float cosTheta = abs(dot(I, N));
    float fresnel = pow(1.0 - cosTheta, 4.0);

    float depth = DepthScale * gl_FragCoord.z;

    gl_FragColor = vec4(depth, fresnel, 0, 0);
}
Here’s the new image processing pass that accounts for the Fresnel term:
-- Vertex.Quad

attribute vec4 Position;

void main()
{
    gl_Position = Position;
}

-- Fragment.Absorption

uniform sampler2D Sampler;
uniform vec2 Size;
uniform vec3 Color;

void main()
{
    vec2 texCoord = gl_FragCoord.xy / Size;
    float thickness = abs(texture2D(Sampler, texCoord).r);
    if (thickness <= 0.0)
    {
        discard;
    }
    float sigma = 30.0;
    float fresnel = 1.0 - texture2D(Sampler, texCoord).g;
    float intensity = fresnel * exp(-sigma * thickness);
    gl_FragColor = vec4(intensity * Color, 1);
}
Downloads
Everything is provided to build and run on Snow Leopard with Xcode, or Windows with Visual Studio 2010.
I consider this code to be on the public domain.